Saving a broken LG L246WP LCD monitor from the landfill
My LG L246WP decided a few weeks ago that it was going to start refusing to turn on in the morning. I’d press the power button a number of times before it would turn on. This got progressively worse until one day it decided it was completely dead. A little googling around revealed that others had a problem with capacitors going bad on LG monitors. It was dead anyway, so I decided to take it apart and see what I could find.
The case on this model has no visible screws. To take it apart you need a very thin pliable putty knife. Wedge it underneath the seam around the edge and you should be able to pry apart the snaps holding the faceplate on. Once the faceplate it off, the backplate unsnaps in a similar fashion. It took a little work, but the end result is:
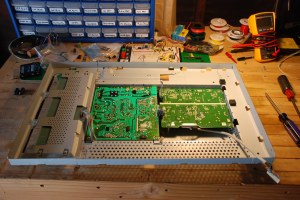
Removing the LCD panel exposes two circuit boards. Given that I was having a problem getting power to turn on I decided to remove the board with the three pronged power plug. NOTE: there’s a 450V capacitor hiding underneath with exposed leads facing you. Do not take apart a monitor without fully understanding capacitor discharge and the dangers therein. A fully charged, high voltage, capacitor can KILL you.
The two exposed circuit boards. Be very careful as there are exposed leads here and you can’t see what danger may be hiding on the other side.
After removing the power entry board, I indeed found swollen capacitors.
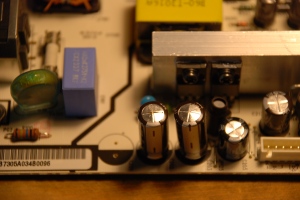 The caps are 3300mF/10V. My local electronics store only had 3300mF/16V caps on the shelf. However, LG engineers were nice enough to include enough space on the board for the larger 16V rated caps. Perhaps this is the problem to begin with? Was the design originally for a larger capacitor, but they used 10V caps for cost savings therefore eventually resulting in this problem?
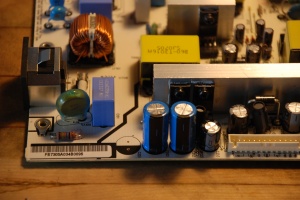
After desoldering the bad caps and soldering in the new caps.
Note how the new 16V caps fit the outline of polarity diagram on the circuit board exactly. A clue perhaps that the original circuit was designed for a larger cap?
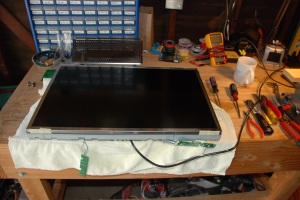
Once the puzzle was put back together a power on test lit up the power on leds. The cost to fix was $1.40 in capacitors. Not bad considering manufacturers have moved away from WUXGA (1920×1200) resolution in favor of the inferior (1920×1080) HDTV resolution.

Thanks. I had the same issue, going to get caps today.
AWESOME!!!! I was able to fix my LG thanks to this detailed description! Thank you
Thanks!! I just fixed my monitor following your instructions, too. Thanks so much for posting this!
Thank you sir! My same monitor as yours started to fail in the same manner. Ordered some replacements and put two new caps in, works well now!
Really messy solder job as I have no idea what I am doing, but it worked!
Soldering takes a little practice, but is not difficult. The key is to get the component hot enough to let the solder flow and then remove the solder before the iron. A good adjustable temperature iron and a clean tip helps as well.
I have problems with colorful vertical lines that would show in the beginning and go away after few minutes. I took out the power supply board but didn’t see any swollen capacitors. Anyone has any idea what might be the issue here?
Although the capacitors may look in good condition (without actually testing them with a good meter) they could be knackered. Try replacing the 2 capacitors and see how you go.
This helped very much, after a very big lightning storm the monitor failed after a massive “CRACK” of lightning, expecting a power supply fault I found no fault, and all voltage rails were normal, noticing the two caps, I replaced them just for good measure, and that actually fixed the fault 😉
I have also just completed a repair of my now non-replaceable monitor with your instruction. Though my local place sold me the caps at $5 each!! But it was still well worth it.
I gave my 24″ 1920×1080 backup away after fixing the 246. Ohh how I missed it.
I would so appreciate a part number for ordering on digi-key or mouser! I know nothing about parts.
Something like EEU-HD1C332B from Mouser should work. It’s just a general purpose electrolytic 3300mF/16V capacitor. Any electronics store should have one.
I just fixed an LG Flatron L246WP 24″ monitor using your instructions. The final key was the Capacitor description. The first two capacitors were bad, just as described! It was very easy, and I know next to nothing about electronics. So, thank you, and let this be encouragement to others.
Hi,
I had the same problem and was ready to look for a new monitor BUT a call to my local electronics dealer convince me to do a little search on the net…
Bingo, I found I wasn’t alone and that there was a solution.
Bought the two capacitors (~1,60 Euros !) and spent 45 min with my father-in-law in disassembling my LG L245Wp 24′.
Guess what ? After replacing the faultly caps, it perfectly works again !
BTW, the most difficult was to reach them =/
So, a MONSTER thanks for this detailed post and for your remote help !!!
Best regards from France
(poorly) Written viewing my coming-back-from-the-dead monitor =)
Thank you for posting the instructions, it brought my wonderful monitor back to life and saved a big wad of cash. Opening the case without breaking anything was the most difficult part, and your instructions were very helpful. My electronics supplier did not have the 3300mF/16V caps with the 105°C temp. rating, so I used 3x 2200mF/16V instead which did have the high temp. rating. There is an extra space on the PCB for the 3rd cap (C201).
I’m not sure if the temp. rating matters here, but the blown caps were rated at 105°C and the display does get quite hot.
I just wanted to say THANK YOU for sharing this! With your help I was able to fix my monitor for $2.70 in parts (Evil California prices). You rock!
Hi, looking for a part # to order a couple of capacitors @ Digikey. Anyone order theirs there? Please pass along the part #. Thanks!
Thanks SO much for posting this. I was trying to fix my monitor off of two youtube vids, the clearer video was a repair on a smaller LG monitor, the not so clear one was on the 24″. I have just ordered this part from Digi-Key P12373-ND as per the recommendation of the tech person i chatted with. The heat threshold is 105c and the usage time is 7000 hrs. I’ll let you know if it works. Right now my monitor is in pieces all over the floor as I ordered the wrong capacitors prior to seeing your blog 😦
As long as the farad value is the same, the voltage rating
can be greater than the original cap. I actually believe that
the original caps were under spec (note the larger outline on
the pcb) and that’s why they fail. LG trying to save money.
Great info! pretty straightforward fix. The caps I bought were also 16v and a bit taller so I had to leave the leads a little longer and bend them over so the circuit board would go back in but works like a charm! Glad to have my true 8 bit color back and 1200p res. Thanks for the post!
Thanks for the clear explanation! As many others who commented above, I don’t have very much soldering experience, but i managed to fix it in no time! The soldering looks like crap, but nonetheless it works :D.
Thank you for this post. My LG L245WP had exactly the same problem and is now fixed!
Here are some further details on the original faulty caps, in case anyone may need them: Samwha WB 3300uF 10V 105*C. Dimensions: d=10mm h=25mm p=5mm (d – diameter, h – height, p – lead spacing). The PCB footprint allows for a d=13mm capacitor to be used as a replacement.
The same problem over here, in Rotterdam, the Netherlands. I haven’t yet got to taking the damn thing apart, but I’ll bet the solution in this case is also the same: replacing the two capacitors will probably do the job. So, great article, thank you for writing this up, you’ve convinced me of fixing the L246WP by myself and I feel a glorious victory comming up soon!
However, there is one question that I have – I believe there is a mix-up in capacitor values.
I do not know alot about electronics, but what I do know about capacitors is that the capacity comes in different ranges, varying from picoFarads (= 0.000000000001 Farads) up to even MegaFarads (= 1000000 Farads). Two common ranges for use in circuit boards are, for instance, miliFarads (mF = 0.001 F) and microFarads (μF = 0.000001 F).
Because the character “μ” is not present on a normal qwerty keyboard, it is sometimes replaced for the letter “u”. But also, the “μ” in (μF) is easily mistaken for an “m”. In the latter case, microFarads mistakenly becomes miliFarads, a factor 1000 bigger.
Now, when reading your article and the replies below, I got confused. Are the two capacitors 3,3mF (=3300μF), as the last poster (Dimitar Kovachev) says (by using the “u” notation) or is it indeed miliFarads (3300mF) as everyone else here is telling us?
Excellent observation!
The mF here points to microFarad, somewhat confusing, I agree. Although a correct term in the SI (metrics) system, the term milliFarad is not commonly used in electronics. Also given the physical size, the caps used here are indeed 3,300 microFarad.
Good luck with the repair, it is so easy, thanks to this blog page.
Thanks mate!
And good timing also… I’m off to the store now!
I also want to thank you for this post, really! Also my LG L245WP had exactly the same problem and I managed to repair it with two 3300uF 16V 105°C caps (I confirm that its’ MICRO Farads). Caps size is 13x26mm like the ones in this post’s pics. My monitor has been manufactured in june 2007 so I guess that this confirms that the average life of those faulty caps is about 5-6 yrs.
I’m ashamed to tell you that I never got back to you to tell you how it went… after bothering you first with the difficult questions (above). I’m sorry for that.
Well, it was a great success! I could just make it in time to get to the store before the weekend closing and get the two 3300μF/16V 105°C caps needed for the repair. Opening the housing was a bit of a struggle, but after that it all went smoothly! The monitor works perfect now.
I want to thank you all and in particular, ofcourse, the topicstarter.
B.t.w: production date is March 2008.
Many thanks for the instructions! I have easily repaired my LG display following them. Ivan
Great post! I tried leaving a reply earlier, but it didn’t seem to get through.
I was wondering, since don’t know much about this stuff, I found some 3300uF 16V caps that are 12.5mmx30mm. Will that fit or do I need shorter ones?
They will most likely fit. The originals appear to be 25mm tall.
I’d be surprised if there wasn’t another 5mm of headspace between
the capacitor and whatever is laying above it. See Dimitar and Marck’s
posts.
I have another question, if you don’t mind. In the post you mention the danger of the exposed leads of a 450v capacitor. So I’m wondering, how safe/difficult is this for an amateur? Can someone with little experience do this, or is it a case of ‘touch the wrong thing and die’? Any safety tips would be much appreciated. 🙂
I was wondering this too. How dangerous is it exactly to do this repair?
I can’t comment directly on how safe it is to do this repair. However, you can educate yourself on capacitance and basic electrical safety and then decide for yourself. You might start here:
http://www.repairfaq.org/sam/safety.htm
and
http://www.repairfaq.org/sam/captest.htm
It worked! Turns out the 30mm caps are a little too long, though. Had to get a little creative on screwing the board back in to make sure the caps didn’t touch the case, but it’s doable. Would recommend other people get smaller ones so everything fits properly.
I was kind of scared about getting electrocuted, but my dad and I both made it out alive. 🙂 All together it took about two hours, and that’s with hardly any experience with this type of stuff.
Thanks again!
Was also able to fix my monitor with the tips here. The hardest part was disassembling the whole thing, took a friend and me about 45 minutes just to get the casing open (only damaged the bevel a tiny bit), then another 20 minutes just to de-solder the old capacitors. The bloody things just wouldn’t get loose.
Soldering in the new ones took about 2 minutes, and putting everything back together about 10 minutes.
So for about 1 euro (50 eurocent per capacitor) and an hour and a half of work, my trusty old L245WP is working perfectly again.
So glad it worked though, because I would have missed “old faithful” quite a bit.
Thanks, fixed mine too!!
… just wandering what would change putting in all three.. Having problems get the right black and white scale on Nokia test.., Thinking about changing some more caps there… Any suggestions?
Adding more capacity to that power-on circuit won’t make a difference there, and certainly not in your image quality. Are you saying the contrast and brightness controls can’t get you solid black and crisp white at the same time? These flat screens don’t really wear out, like the old CRTs did. You may lose some brightness from dimming CFLs over time, but after how many hours? Do you know someone with a screen calibrator? That may help to balance things.
Have in mind that if you don’t have this common failure ( not powering on),
you may look at defects on the other boards or other components.
While the monitor was working, a “solarized” effect was all over the panel.
You can see the same error appearing here :
http://blogs.yahoo.co.jp/ggbyc261/12004414.html
While the capacitors were fine, it appears that the T-CON board, which is bolted on the back of the panel, was faulty.
I ordered the board ( same for monitors sharing the AUO M240UW01 Panel , e.g. BenQ Q24W5) with board code 55.24M01.011 – 05M16-1D.
Replaced it and my monitor was back alive!!!
i have the same Monitor, BUT my problem is red lines on one side of the screen that go up and down quickly and also the monitor turns black for a few seconds and comes back, i lowered the brightness and it helped a little, now it turns off once in a while but still annoying and colors are dark as heck…i opened the monitor and found no capacitor to be puffed, any advice? thanks so much for the great writeup.
Speedy
Awesome tutorial, applied it to a LG L245WP that had the same problem, and now is working fine.
Happy new year
Just fixed my L246WP . Same issue (same bulging and leaky Samwha caps), same fix . I used Panasonic NHG series 3300uF 16v caps (what my local parts place had available). Thanks for documenting this.
Hi I have a LG L246wh and my power supply has blown cap C115 , the side that blew was the one with the rating on it , does anyone know what value it should be?
Thanks for you very helpfull site
Just fixed my L246WP. I feel pretty lucky, I got 7 or 8 years out of it. That’s a lot of gaming 🙂 I ordered parts from Digi-Key, but only got the 10V capacitor it originally came with, which was however the size of the marking on the board.
Digi-Key part number: 565-1512-ND
Mfg part number: EKY-100ELL332MK25S
United Chemi-Con 3300uf 10V 8000 Hrs @ 105c.
I guess 10 V caps probably should do fine for about 7 or 8 years or so, if you’re lucky 😀